How to orient yourself in space while drawing?
“You don’t see what you’re drawing, how do you know where to draw a line?” People often ask us this question while looking at some of our work. Certainly, experience plays here the most important role. Regularly drawing freezelight, you’ll get a better feeling for the space you are working in, getting better and better every day. Nonetheless, there are a few tricks to help you gain confidence a lot faster.

- First of all, to get a feeling for the intended scope of work you must be sure about the frame edges. In order to do that you must take a look through the viewfinder and figure out what’s inside the frame and what falls outside. It’s easiest to do when there are objects in the frame. For example, a composition in the frame allows you to draw with light from the night stand to the desk, and the top edge of the frame is at the height of the floor lamp. It can happen that there are no objects suitable as markings, for example you are working in a photo studio. In this case a person should enter the frame. Then the distance from the point of an intended drawing to the frame edges can be measured by counting steps, and height can be measured by a raised hand.
- In order to orient yourself in space you have to have a clear idea about what your are going to draw. It’s only possible to create a recognizable drawing out of a few strokes when you understand clearly what contours it’s made up of. For this we recommend making sketches, that is first sketch out your idea on paper. You’ll see right away which lines must be left out and which ones must be simplified. Ideally, you will achieve an understanding of the sequence of your movements.

You did all of the above, but the drawing still doesn’t come out right. There could be a number of reasons:
- The resulting image looks like a glow blob. Separate elements are discernible, but they are jumbled together. This is the most common mistake. You’ve underestimated the width of the light trace. You continue drawing much as you’re used to on paper, the size of a figure in your picture could have very well fit on a letter-sized (A4) sheet. The light trace you’re drawing with is much wider than that of a pen or a pencil. The brighter your the flashlight, the broader the beam it projects, the greater is the width of a light trace. To not take this into consideration is about the same as drawing in a notebook with a paint roller. You have to either adjust the scale of the drawing or choose much finer light source.
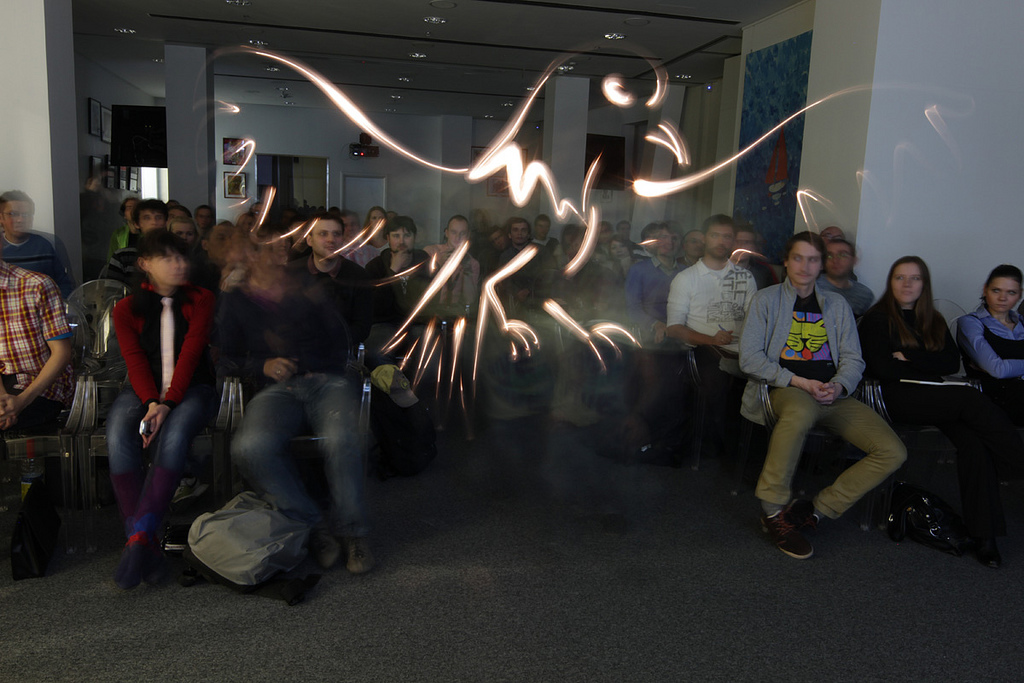
Lines all out of place, the arm grows out a stick man’s belly, nose is placed above the eyes and so on. You don’t have a feeling for the space, you don’t know where to draw the next line and just flail about haphazardly. You need guides .
- The simplest guide is the tripod, the one your camera is attached to. Basically, it serves as an axis, the kind you might remember from your art classes in school. You drew a vertical line and threaded ovals onto it, and you got a jar as a result. Now this line is in front of you, so go ahead. This technique makes it relatively easy to produce symmetrical freezelight drawings.
- More complicated drawings require more axis. You can use your body. You are your own coordinate grid. Place the drawing respective to the parts of your body. For example, your character’s paws will go from the floor up to the knee level, its eyes — at your chest, its smile will be on you belly and its ears will be as wide as your outstretched arms.
- As you perfect your freezelight skills, you will eventually need to draw and not to remain stationary. The coordinate grid aligned to your body will then fall apart, at least somewhat. This is when you should remember that your have one hand free. If you are working with a number of flashlights, often there is a problem of getting to the point you started from. Grab air with your free hand, place one flashlight at a point where you want to get back to, grab another one and continue drawing. Naturally, everything has to be within reach, so you won’t have to leave your spot. This way you will be able to maintain control of your drawing, phase after phase, while utilizing a number of light sources.

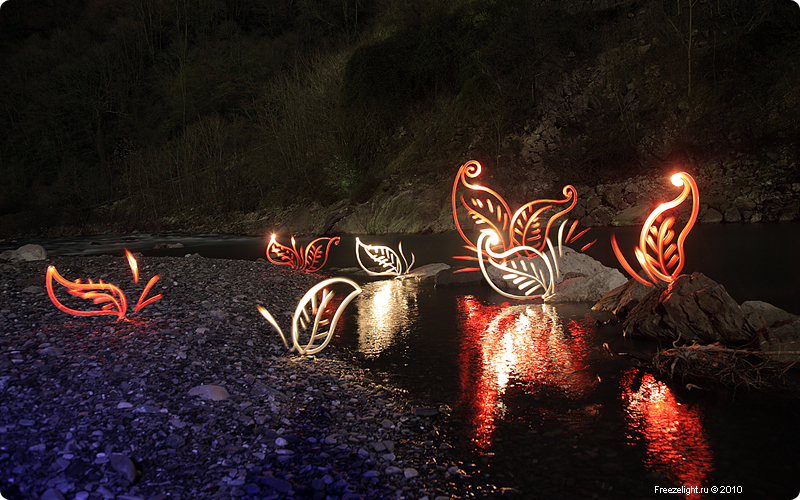
- If you are going to draw a number of characters and do not want them to overlap, one way to do it is to mark the space in front of you with the help of coins or other small objects. Draw in front of these objects so that they will not show up in the photo — the light trace will swallow the objects behind it.
Some light traces completely vanish and do not show up in the photo.
- First of all, it’s possible that the light source you’re using is not sufficiently bright. It’s also quite possible that available light washes out the picture or that you closed the aperture too much. If this is the case, change your shooting position or adjust your settings.
- Secondly, there’s another reason that has specifically to do with your orientation in space — you are not shining the flashlight into the lens. Some highly enthusiastic souls get so carried away, they forget the importance of constantly directing the light source towards the camera. If light doesn’t enter the lens, the line vanishes, if light partially reaches the lens, the line fades.

Keep practicing, 99.9% of freezelight quality is practice. It will take time to successfully apply our advice.
Другие записи:
- Teaching a compact camera to take freezelight pictures
- Журнал «Хулиган» ▪ Ноябрь 2009 года
- Фризлайт-анимация ▪ Урок 2 ▪ Сборка
- Журнал «Свой среди чужих» ▪ Июль 2010 года
- Ищем новые формы